
Welcome New Members! We want to hear from you. Register, stop lurking and start posting!
Greg's Photos, Reports and creative thoughts
- wolfcat
- Cumulonumbus Calvas
- Reactions:
- Posts: 562
- Joined: Sun Mar 07, 2010 12:14 pm
- Location: Bentleigh East
- Contact:
Re: Greg's Photos, Reports and creative thoughts
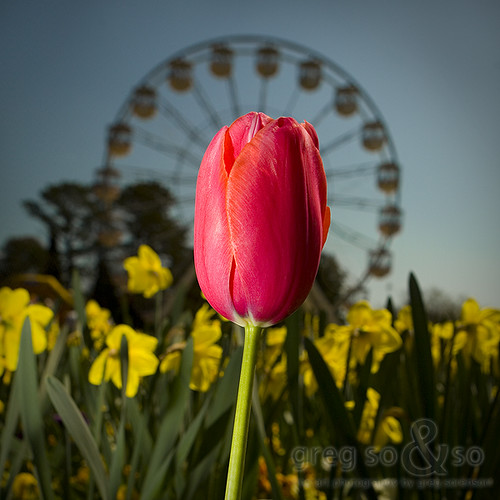
amazing colour that is a real keeper
other places you will find me...
My blog...http://www.wolfcat.com.au/randomrants/
Flickr .. http://www.flickr.com/photos/wolfcat_aus/
Twitter... http://twitter.com/wolfcat
Redbubble... http://www.redbubble.com/people/wolfcat
My blog...http://www.wolfcat.com.au/randomrants/
Flickr .. http://www.flickr.com/photos/wolfcat_aus/
Twitter... http://twitter.com/wolfcat
Redbubble... http://www.redbubble.com/people/wolfcat
-
Australis(Shell3155)

- Supercell
- Reactions:
- Posts: 3147
- Joined: Mon Nov 30, 2009 8:05 pm
- Location: FTG
- Contact:
-
Greg Sorenson

- Cumulonimbus
- Reactions:
- Posts: 104
- Joined: Thu Nov 26, 2009 11:03 am
- Location: Bruce, Canberra
- Contact:
Re: Greg's Photos, Reports and creative thoughts
Thanks peoples.
Got up early for this one and explored some of the western regions of the ACT.

Got up early for this one and explored some of the western regions of the ACT.
Planning on living a long time. There's so much to do in such a short space of a life!
- rikjpool
- Storm Chaser
- Reactions:
- Posts: 989
- Joined: Thu Nov 26, 2009 1:46 pm
- Location: Home: North Bendigo-just behind Lake Weeroona, Vic. Work: 1.5Km SE from Bendigo AWS
Re: Greg's Photos, Reports and creative thoughts
Outstanding, amazing, and spectacualr all in one. 
Like the new watermark as well.
Like the new watermark as well.
I live in a world where I dont see to believe, but I believe to see...
-
Joeby

- Cumulus
- Reactions:
- Posts: 26
- Joined: Tue Mar 23, 2010 10:16 am
- Location: Kalimna, Lakes Entrance
Re: Greg's Photos, Reports and creative thoughts
Greg your work is brilliant! Really inspiring stuff, thanks for sharing.
Im slowly getting into the long exposure work, learning a lot as I go. Using a 10 stop B&W filter atm but I think Im going to have to get into stacking grad filters, this work of yours is just stunning.
Im slowly getting into the long exposure work, learning a lot as I go. Using a 10 stop B&W filter atm but I think Im going to have to get into stacking grad filters, this work of yours is just stunning.
-
Greg Sorenson
- Cumulonimbus
- Reactions:
- Posts: 104
- Joined: Thu Nov 26, 2009 11:03 am
- Location: Bruce, Canberra
- Contact:
Re: Greg's Photos, Reports and creative thoughts
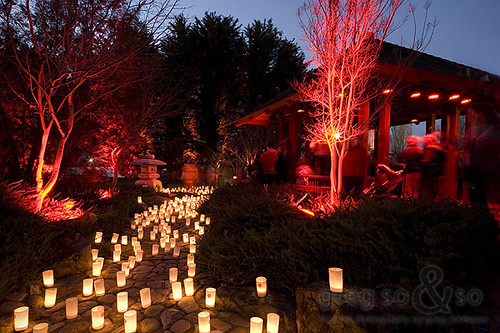
thanks again for your kind comments guys. To answer john's question, the scene was fairly monochromatic as i as looking directly into the sun, so most of the colour was bleached, with only a little yellow and sepia from what i could see. I tried to replicate this with a little desaturation, but not all the way. The result is more of a focus on the tone and linear qualities of the lights play.
I got up early again this morning but it was a little warmer so the fog wasn't as interesting, so more of a scouting mission for next time.
hey Rikki, yer, am working on my first website, and you guessed it, gregsoandso.com is the address. Unfortunately there's a New York fashion photographer with the same name, so obviously i couldn't register a domain name of the same ilk. Nothing much on it atm, so i'll announce it when it's ready. Sort gotten past flickr and red bubble and wanted one of my own.
Planning on living a long time. There's so much to do in such a short space of a life!
- Lily
- Supercell
- Reactions:
- Posts: 4014
- Joined: Wed Nov 25, 2009 10:29 pm
- Location: Rowville/Lysterfield
Re: Greg's Photos, Reports and creative thoughts
Absolutely awesome stuff, Greg - you're very talented (and I'm very envious!) 
-
Greg Sorenson
- Cumulonimbus
- Reactions:
- Posts: 104
- Joined: Thu Nov 26, 2009 11:03 am
- Location: Bruce, Canberra
- Contact:
Re: Greg's Photos, Reports and creative thoughts
Just a couple more from last Sunday, getting the hang of my website and all it's facets, like pulling one's hair out:)
Image taken from Cotter, looking se towards Black Mountain (Telecom Tower) and Canberra.

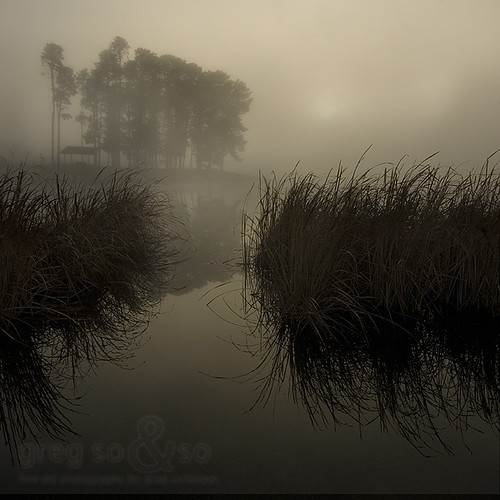
On one of my favourite roads, Coppins Crossing Road, there are sporadic gum trees that were shrouded on and off with mist.

Image taken from Cotter, looking se towards Black Mountain (Telecom Tower) and Canberra.
On one of my favourite roads, Coppins Crossing Road, there are sporadic gum trees that were shrouded on and off with mist.
Planning on living a long time. There's so much to do in such a short space of a life!
-
Greg Sorenson
- Cumulonimbus
- Reactions:
- Posts: 104
- Joined: Thu Nov 26, 2009 11:03 am
- Location: Bruce, Canberra
- Contact:
Re: Greg's Photos, Reports and creative thoughts
Ok, have been putting up some images on my new website. More of my favourite images from the past 4 years will trickle onto it, there's the majority still to go, eeek.
I also have to insert a shopping cart system at some stage, and probably a page for my illustration / painting work, in addition to a contact form... errrrrr. Lots to do.
But you get the picture.
http://www.gregsoandso.com/
I also have to insert a shopping cart system at some stage, and probably a page for my illustration / painting work, in addition to a contact form... errrrrr. Lots to do.
But you get the picture.
http://www.gregsoandso.com/
Planning on living a long time. There's so much to do in such a short space of a life!
-
Greg Sorenson
- Cumulonimbus
- Reactions:
- Posts: 104
- Joined: Thu Nov 26, 2009 11:03 am
- Location: Bruce, Canberra
- Contact:
Re: Greg's Photos, Reports and creative thoughts
Autumn in Canberra.... although this was taken last week and all the leaves have now dropped. Got in just in the nick of time:)

Planning on living a long time. There's so much to do in such a short space of a life!
-
Joeby
- Cumulus
- Reactions:
- Posts: 26
- Joined: Tue Mar 23, 2010 10:16 am
- Location: Kalimna, Lakes Entrance
Re: Greg's Photos, Reports and creative thoughts
Stunning work Greg, love this one

Re: Greg's Photos, Reports and creative thoughts
Agree, beautiful photo! The man walking is a very subtle, but nice touch.
I'm just starting to learn all this stuff, but is that a HDR image or was there any other techniques you used Greg?
I'm just starting to learn all this stuff, but is that a HDR image or was there any other techniques you used Greg?
-
Greg Sorenson
- Cumulonimbus
- Reactions:
- Posts: 104
- Joined: Thu Nov 26, 2009 11:03 am
- Location: Bruce, Canberra
- Contact:
Re: Greg's Photos, Reports and creative thoughts
Thanks guys,
To answer the technique question for this one, there were only minor alterations made in PShop mainly because i got the shot that was after in the camera. I have a personal preference of not using the HDR function in PS as i can usually achieve a balanced exposure in shadows, mids and highlights on location by a couple techniques. In most cases i expose for the highlights first, as i personally try to avoid burning highlights where ever possible as it's lost information - it's just white.
I may in addition to this take another of the same image to expose the shadows and then blend them together manually. The problem with HDR's if they aren't done correctly, is that they tend to look a little odd. That is, if what you are trying to achieve is representing the scene as it is seen with the human eye, than sadly a simple click of a button wont achieve a realistic look. You may be after something a little unusual and HDR's are your solution, then that would be okay because it's your desired result.
Each time i shoot i take ND grad filters with me, because foreground and sky have different tones. You will see a lot of severe weather photos on this and other forums whereby the clouds are beautifully exposed, but the foreground is black and without detail - the opposite to the burnout white. So ND filters give you the option to darken the brightest area of your scene, and create a balanced exposure for the high and low range of tones, whilst out on site.
Now getting back to this picture, i didn't have to use any of the techniques that i just described. Sorry, i ramble on a bit. My plan as to make use of the local fog to diffuse the direct sun light, which provided a fairly balanced range of tones. So, no filters, no blending images together in PShop, just more or less using the fog as a tool to do most of the work for me. I took shots from all different angles, down low, with pedestrians close, multiple pedestrians, into the sun, away from the sun, looking through leaves. Eventually it came down to the right balance of light coming through the fog, the right distance for the person in my frame, the right composition, and keepng it simple.
I use a few compositional queues in my images, one being the rule of thirds which is a no- brainer system for when you are under the pump to bring all the elements together on the fly, as in this case i was working to capture the moment. In this image you can see that the horizon sits roughly a third from the bottom, the person and the foreground tree also sits on the vertical thirds, so a balance has been achieved.
The PShop work done on this image was
1- i increased the saturation by a very small amount. Looking directly into the sun can sometimes wash out colours which in this case was meant to be the autumn theme- colour!
2- i slightly tweaked the contrast to give the foreground some punch and help frame the pathway as the branches go over the top.
3- i added a slight vignette to the border to darken the highlights that hit the edge of the frame - the general rule is that the eye will go to the brightest part of an image, so i wanted the viewer to be looking at the person, not the edge of the image.
4 - i used the dodge and burn tool to ever so slightly darken the man, just to make him stand out a little more in the fog
5 - once i had completed all this i made a duplicate and made a smaller version of the image and then run a sharpen filter for web display which is my usual thing along with the water mark.
Hope this gives you an understanding to my thinking when i shoot. I'm always thinking and asking questions like, "what am i trying to say with this image", "how can i make the viewer se what i want them to see", and most importantly "why is my eye drawn to this scene. What makes it so interesting that i turn my head and looked at it." Because if you can have answer to that last question, then you start plan your image, even if it means coming back to the same location again and again. I actually didn't take any photos this past weekend despite getting up at 5am both days, as i had an image that i have in mind for a particular location, however the sunrise on both days as it turned out didn't cut it for me. So not one image:)
Last edited by Greg Sorenson on Mon May 24, 2010 12:31 pm, edited 1 time in total.
Reason: poor grammatical errors, bloody hell i suck at English.
Reason: poor grammatical errors, bloody hell i suck at English.
Planning on living a long time. There's so much to do in such a short space of a life!
-
Greg Sorenson
- Cumulonimbus
- Reactions:
- Posts: 104
- Joined: Thu Nov 26, 2009 11:03 am
- Location: Bruce, Canberra
- Contact:
Re: Greg's Photos, Reports and creative thoughts
Just a few images from early July. Just been too busy to go out in recent weekends, but hope to take some happy snaps down at Falls creek next week.


This one was some multiple exposures of myself acting out a hostage scene, was kinda fun in the spooky forest.


This one was some multiple exposures of myself acting out a hostage scene, was kinda fun in the spooky forest.
Planning on living a long time. There's so much to do in such a short space of a life!
- GregSorenson2
- Cumulus
- Reactions:
- Posts: 68
- Joined: Thu Sep 16, 2010 11:08 pm
Re: Greg's Photos, Reports and creative thoughts
I haven't posted in this section in a long long time.... sounds like a Star Wars title....
So i'll post up a bunch full to catch up: all these images are from around the Canberra region, during different fesitivals, locations etc.... you get the drift. I think pretty much all of these image were taken with my 17mm Tilt Shift, although i have used it as a regular prime wide angle without tilting or shifting. Shots taken during twilight are what you see is what you get, daytime ones i've used a 4 stop grad Singhray filter to balance out sky and foreground.
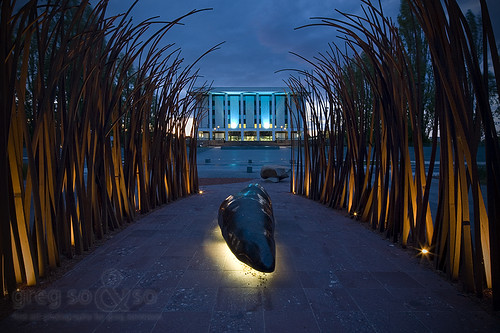
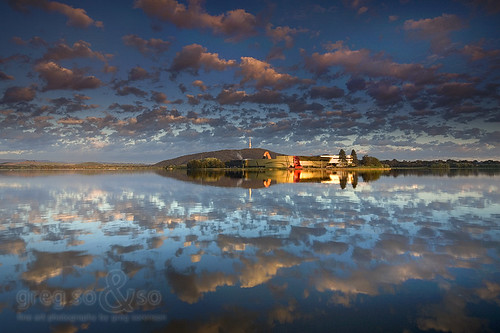

So i'll post up a bunch full to catch up: all these images are from around the Canberra region, during different fesitivals, locations etc.... you get the drift. I think pretty much all of these image were taken with my 17mm Tilt Shift, although i have used it as a regular prime wide angle without tilting or shifting. Shots taken during twilight are what you see is what you get, daytime ones i've used a 4 stop grad Singhray filter to balance out sky and foreground.
Last edited by GregSorenson2 on Fri Oct 22, 2010 9:02 pm, edited 3 times in total.
Re: Greg's Photos, Reports and creative thoughts
Can't see anything Greg. Just the word image over and over.
Re: Greg's Photos, Reports and creative thoughts
Work now. Fantastic clarity and color!
Care to share your settings, Greg? Interested to hear how long you had the shutter open for those twilight shots.
Care to share your settings, Greg? Interested to hear how long you had the shutter open for those twilight shots.
- GregSorenson2
- Cumulus
- Reactions:
- Posts: 68
- Joined: Thu Sep 16, 2010 11:08 pm
Re: Greg's Photos, Reports and creative thoughts
yer sure mate, love to.
In a nut shell, i used 17m tse (tilt shift), or at the very least a good prime lens. I use a tilt shift cause it allows me to straighten vertical lines on buildings, or in most wide angles you could call barrel distortion.
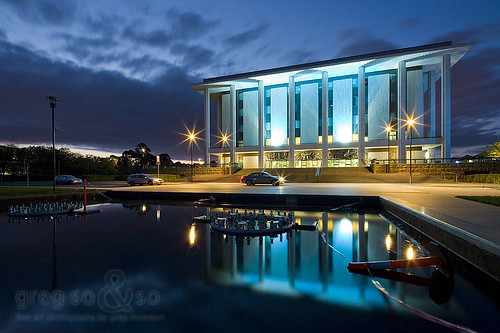
For twilight shots with a focus on architectural lighting, i use an iso setting of 50-100. Really great for keeping the pixel noise / grain down as much as possible. My f-stops hover between 16 to 22, so that i'm still keeping broad depth of field. I always use a tripod, i'd say when the sky reaches that nice blend of aqua and ultra-marine blue you would be looking at a shutter speed of approx 20-30 seconds, so in the early stages of shooting i'm in bulb, then switch to aperture priority. Mainly because the light comes on so quickly, i can let the camera work out the shutter speed for me, one less thing to worry about:) I try and get enough ambient light that shows some detail in paving surfaces, walls etc. One of my aims to avoid areas without details, in the shadows and the highlights. So if i'm shooting during sunsets, when the colour blue finally goes out of the twilight sky, i stop shooting. The other bonus is that most building lights are tungsten, or orange if you will. The direct opposite of this on the colour wheel is blue, which is the sky. The effect being that the colour contrast makes the building really pop, which in my opinion is the one of the best ways of creating a punchy image.
The reason why the images seem so sharp is that i make duplicate image, reduce the image size to say 600- 800 px wide, then i do a PS sharpening filter once only. It's enough to make the image seem really sharp on screen. Don't trust the PS save for web function, the images never come out as sharp.
I hope this all makes sense. Trial and error over the years on my part and i hope that any advice i can give other people will save some heartache.
In a nut shell, i used 17m tse (tilt shift), or at the very least a good prime lens. I use a tilt shift cause it allows me to straighten vertical lines on buildings, or in most wide angles you could call barrel distortion.
For twilight shots with a focus on architectural lighting, i use an iso setting of 50-100. Really great for keeping the pixel noise / grain down as much as possible. My f-stops hover between 16 to 22, so that i'm still keeping broad depth of field. I always use a tripod, i'd say when the sky reaches that nice blend of aqua and ultra-marine blue you would be looking at a shutter speed of approx 20-30 seconds, so in the early stages of shooting i'm in bulb, then switch to aperture priority. Mainly because the light comes on so quickly, i can let the camera work out the shutter speed for me, one less thing to worry about:) I try and get enough ambient light that shows some detail in paving surfaces, walls etc. One of my aims to avoid areas without details, in the shadows and the highlights. So if i'm shooting during sunsets, when the colour blue finally goes out of the twilight sky, i stop shooting. The other bonus is that most building lights are tungsten, or orange if you will. The direct opposite of this on the colour wheel is blue, which is the sky. The effect being that the colour contrast makes the building really pop, which in my opinion is the one of the best ways of creating a punchy image.
The reason why the images seem so sharp is that i make duplicate image, reduce the image size to say 600- 800 px wide, then i do a PS sharpening filter once only. It's enough to make the image seem really sharp on screen. Don't trust the PS save for web function, the images never come out as sharp.
I hope this all makes sense. Trial and error over the years on my part and i hope that any advice i can give other people will save some heartache.
- GregSorenson2
- Cumulus
- Reactions:
- Posts: 68
- Joined: Thu Sep 16, 2010 11:08 pm
Re: Greg's Photos, Reports and creative thoughts
Just a few more from around Canberra. Getting to love this place:)

- Hamlan
- Storm Chaser
- Reactions:
- Posts: 449
- Joined: Tue Dec 22, 2009 11:05 pm
- Location: Northern suburbs
Re: Greg's Photos, Reports and creative thoughts
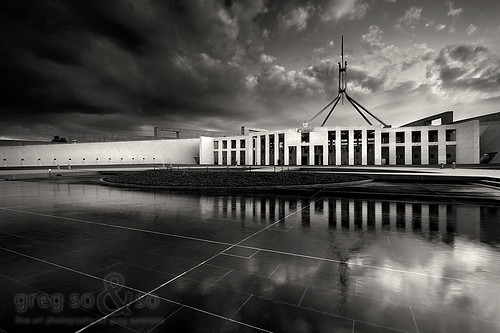
Nice shots as usual Greg, particularly like the blue/grey/black colours and the rule of thirds and rule of repitition you've captured in your 2nd last image and some of the pics on pg2 are excellent 